Ditch
Lights
In order to comply with Federal Mandates, the railroad had to start installing additional lighting on their locomotives. Therefore we, as serious scale railroaders, must follow suit and install ditch lights on our locomotives. In order to do this, we the Western Illinois Railroad and its subsidiaries had to build our lights from scratch.
The first order of business was to go out and take more photographs of the prototype. After enough information was gathered work was started. The first thing made was an aluminum part turned on the lathe to the proper contour of a ditch light housing.

The little hinges and latch were added. I then made a small piece to simulate the hinge bolt and wing nut. These patterns were then made into lost wax castings of brass.
This process involves making a rubber mold of the item to be cast. A hot wax is injected into the mold. When it is cool you have a wax duplicate of the final product. All the little waxes are mounted on a wax tree. These are set into a can and the can filled with plaster. The wax is later melted out and the hollow area in the plaster is replaced with molten brass. That is the process in a nutshell. A very small nutshell.
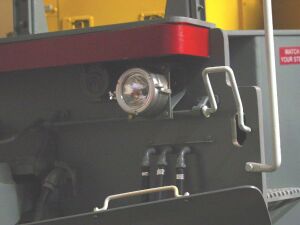
A mag-light reflector happened to be the right size to fit into the housing. Into that I inserted an ultra bright 12 volt LED. The outer lens was made using a clear plastic that
was formed on a vacuum form machine. That process involved heating a sheet of plastic and then sucking it down through some holes in a piece of metal.
Castings made in a rubber mold are not perfect so some machining is required if the surface has to be exact. The housing castings had to be machined internally so they were round and would except the reflector and lens. After this was completed the next step was to do the mounting holes. The mounting holes were drilled and tapped in the back for 2-56 bolts. The little door hinge nut was drilled with a #56 drill and held in place with a brass wire and super glue.
The completed assembly was sand blasted and primed. Later I painted the housing with aluminum paint. The LED was press fitted into the back of the plastic reflector and this part was complete.
The final chore was making
the brackets to hold the lights on to the locomotive. A bunch of designs
later I finally had one that fit the locomotive. The lights were now ready
for wiring.
We are going to install a flashing system connected to our horns. Our
theory is that we got-em why not use-em.
 |
 |

Below is an interesting letter
written by a Norfolk Southern Engineer to another
friend discussing the general practice of using ditch lights.
|
Written by Engineer Rowland: When the ditch lights first came out on the SP there were two or three configurations that were in common use. The first were the solid on off no flashing design. The lights were controlled by a switch on the control stand. The engineer could go from solid on to flashing if he so chose by repositioning the switch.
The next step was to actuate them by blowing the horn. The lights would then continue to flash for 30 seconds after the horn stopped blowing. Also, there was a push button on the control stand that would make the lights flash.
The original rule was that they were to be on, or flashing if the feature was available, when going over a grade-xing. To use the engineers words, “ They didn’t make a damn bit of difference when it came to stopping the morons from driving around the gates and getting hit.” However according to Engineer Rowland, “They sure did light up the night and make it much more pleasurable to run after dark, especially out in the boonies.”
Over the past few years Rowland states that he has seen fewer units that still had the flashing ditch lights on them. It seems as though the railroad realized that the flashing did little or nothing to stop people from pulling out in front of a train.
As time went on, due to maintenance costs, the flashers were slowly eliminated as it was just one more thing the railroad had to fix. At this point the railroads have narrowed it down to the FRA requirement that you, the engineer, must have working ditch lights on the lead end of the lead unit and they must be on when going over a grade-xing or reduce your speed to a maximum of 20 mph until the train is clear of the crossing with the lead unit, then you can resume timetable speed.
As an added note: Norfolk Southern who up until about seven or eight years ago ran their locomotives long nose first. They added ditch lights to both ends of the locomotive so the units would not have to be turned.
A special thanks to Jack Gerstner and his friend Rowland for help in researching this article. |